Create dynamic list
#
Create a new dynamic listGo to Audience Module >> Dynamic lists. The Dynamic list screen will be displayed.
From this screen, users can create dynamic lists by performing the below steps.
#
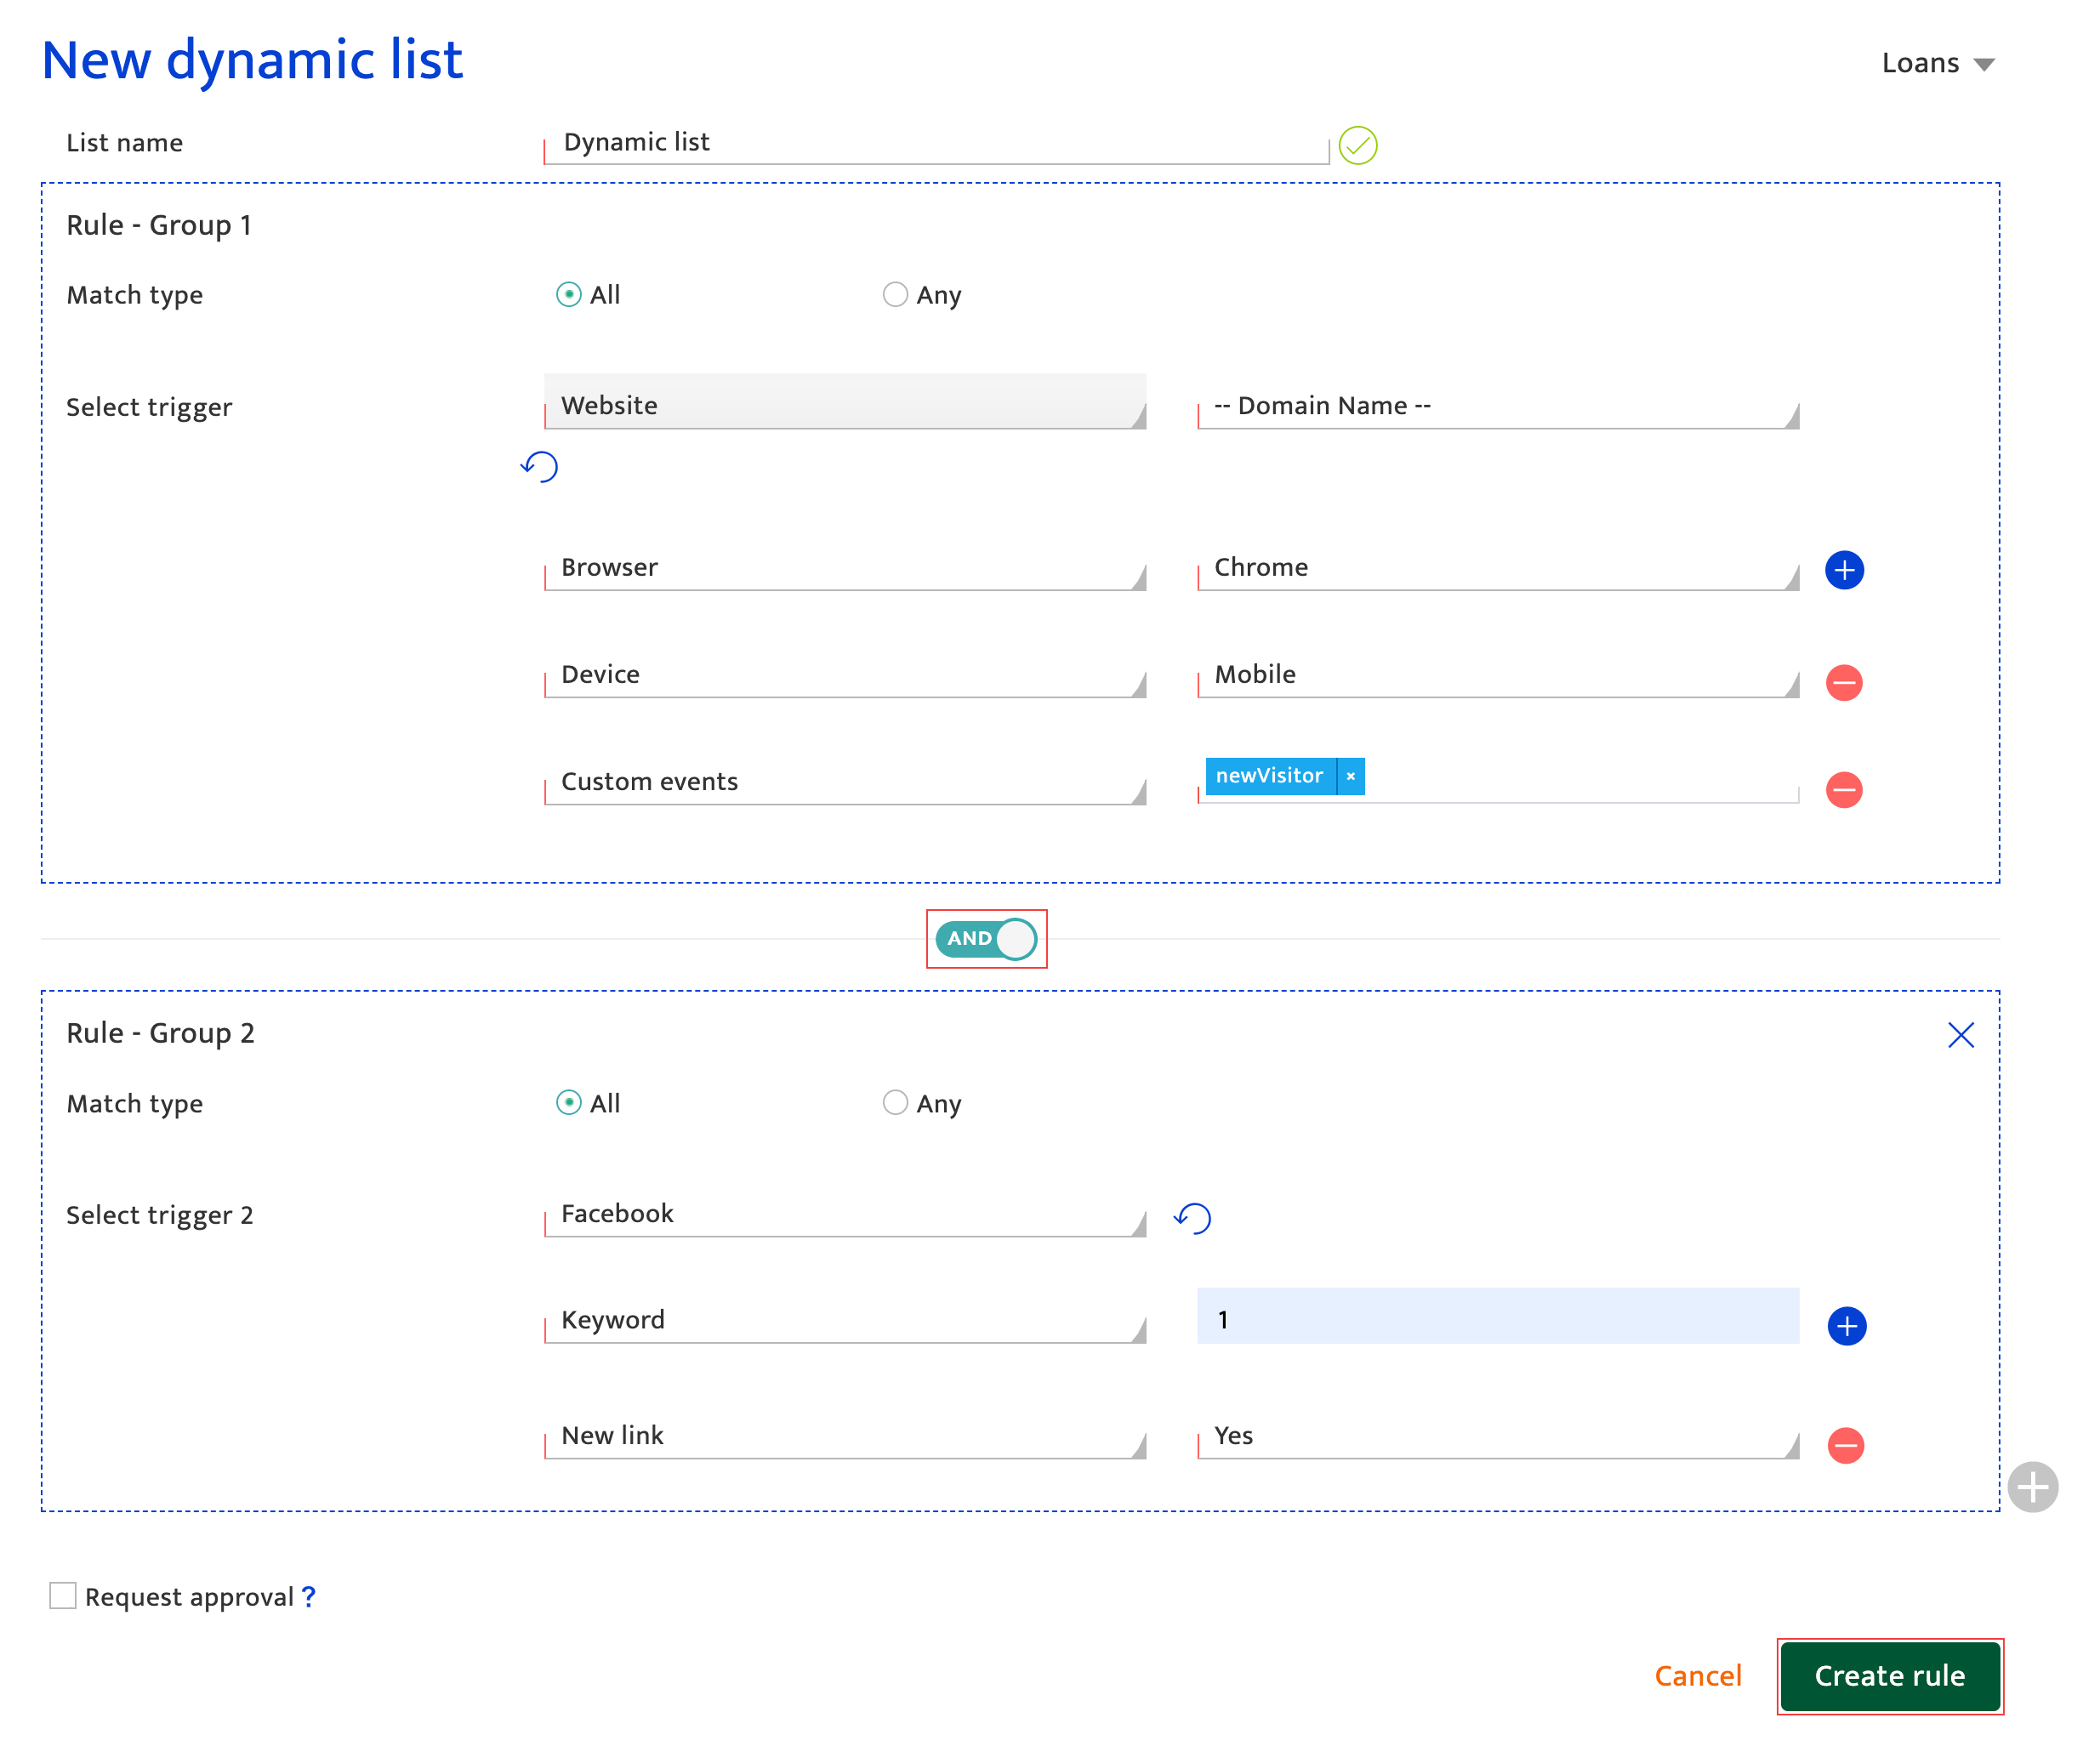
Steps to follow- Click the icon on the top- right pane of the screen. The New dynamic list screen will be displayed.
- Enter the List name. Once the List name is entered, the Rule section will be enabled.
- Add Rule โ Group 1.
Select trigger source from the drop-down list. Based on the selected trigger, additional fields will be displayed. User needs to enter the appropriate information in these fields by using the drop-down list or by manually entering the information. The users who satisfy the conditions defined for the trigger sources will get added to the dynamic list to be created.
The list of available trigger sources, the associated fields and the trigger actions are added here
- Enter the appropriate information in the additional fields by selecting from the drop-down list or by manual entry.
- Click the icon to add more rows for the Rule group. Each Rule group can have a maximum of 5 rules.
- Enter the appropriate information in all the additional fields.
- Select the Match type as All or Any using the radio buttons.
- Selecting button indicates all the rules must be satisfied in the rule group to create the dynamic list.
- If button is selected, specify the rules in the group that need to be satisfied for the list to be created.
- Click the icon to remove a particular field
- Click the icon to erase all the information and reset the Source field.
- Add Rule โ Group 2 by clicking the icon on the bottom-right of the Rule section. Users can add up to 2 Rule groups
- Define all the parameters as mentioned for Add Rule โ Group 1 (Refer step 3).
- Specify the combination for Rule Groups 1 & 2 using the AND/OR toggle key.
- Select AND to consider all the attributes defined in both the rule groups for the list creation.
- Select OR to consider any of the attributes in the rule group for the list creation.
- Select the symbol associated with the rows to set the condition as mandatory.
- Request for approval
- Select the Request Approval checkbox. The email field will be displayed.
- Select the email of the approver to whom the request is to be sent.
- Users can select one or more recipients from the drop-down list
- If multiple recipients are selected, Approval settings button will be enabled.
- Click the icon. The below pop-up screen will be displayed.
- Select All to get the approval from all the approvers (or)
- Select Any to get the approval from any of the approver, accordingly, select the number from the associated drop-down list.
- Click the Save button. The request for approval will be sent to the respective recipients.
Note:
- Click the Create rule button. The Dynamic list dialog box will be displayed
- Enter a name for the dynamic list
- Click the Save button. The dynamic list is created and displayed in the Dynamic list screen.
Note:
#
List of Trigger sourcesFor each Trigger source, select an Action Type from the drop-down list and provide the secondary information in the additional field. The users will be added to the list if the conditions specified in the fields are satisfied.
The available sources of triggers, the associated action types, the secondary information to be entered and who are the users added to the dynamic list under creation are mentioned in the below tables.
#
Trigger actions based on websiteTrigger Source | Action Types | Secondary parameters | Trigger actions that will add the users to the dynamic list |
---|---|---|---|
Website | When a user visits the website | Enter Website URL | The users who visited the specified website URL |
When a user visits a specific page | Enter Page URL | The users who visited the specified web-page URL | |
New Visitors | - | All first-time visitors of the website | |
Returning visitors | Select the number of times the visitor has returned to the website from the drop-down. | The users who already visited the website and exit, returned to visit the website again. | |
Page views | Select the number of times the visitor has viewed the page from the drop-down. | The users who visited the page for the specified number of times | |
Page depth | Select the percentage of Page depth from the drop-down. | The users will be added based on the extent (depth) of the visit of the web page (from top to bottom). | |
Session duration | Select the Session duration from the drop-down. | The users who visited the website for the specified duration. | |
Traffic source | Select Traffic source from the drop-down. | The users who have been redirected to the website from the specified source. | |
Location | Enter the location manually | The users whose IP address location matches the specified location. | |
Language | Select Language from the drop-down. | The users who visited the website from the browsers that are configured in the specified language. | |
Device | Select the Device from the drop-down. | The users who accessed the web page via the specified device namely PC, Tablet, and mobile. | |
Browser | Select the browser from the drop-down. | The users who accessed the web page via the specified browser namely Internet Explorer, Google Chrome, and Mozilla firefox. | |
Operating system | Select the Operating system from the drop-down list | The users who visited the website using the device which has the specified OS namely Windows, Linux, iOS etc. | |
Last Visit | Select last visit from the drop-down | The users will be added based on the selected values. | |
Sign in | Select Yes or No from the drop-down list |
| |
Newsletter subscribed | Enter the information manually | The users who have subscribed for the newsletter | |
Custom events | Select from the drop-down | The users who have satisfied the specified custom events |
#
Trigger actions based on LocationTrigger Source | Action Types | Secondary information | Trigger actions that will add the users to the dynamic list |
---|---|---|---|
Location | Latitude & Longitude - Radius | Enter Latitude, Longitude and Radius information | The users who enter the specified radius of the specified Lat-Long will be added |
Beacon | Select the Beacon and secondary information (as below) from the drop-down
| The users who enter/exit the specified beacon area of a premise.
| |
City/Area | Select the City and Area from the drop-down | The users who are in/have entered the specified area and city will be added. | |
Location URL | Enter the location URL or select from the map by clicking the map icon | The users who have entered in the specified location will be added. |
#
Trigger actions based on Subscription FormsTrigger Source | Action Types | Secondary information | Trigger actions that will add the users to the dynamic list |
---|---|---|---|
Subscription Form | Forms | Select the Form name and Status from the below options using the drop-down list
|
|
Attributes | Select the primary and secondary attributes from the drop-down | The users will be added if they have entered the specified attributes into the form. | |
Form submission date | Select +, -, < or > from the drop-down. Enter the number of days. | The users will be added based on the selected values i.e., either before or after the specified days. Example: +2 means users who have submitted the form before 2 days. | |
Page URL | Enter the page URL | The users who have visited the specified form URL. |
#
Trigger actions based on WeatherTrigger Source | Action Types | Secondary information | Trigger actions that will add the users to the dynamic list |
---|---|---|---|
Weather | Summer | Select Weather from the drop-down list and enter the secondary information such as country name, months and so on | The users will be added if their location is based on the specified weather. |
Rainy | |||
Temperature (F) | |||
Autumn | |||
Winter | |||
Spring | |||
Clear | |||
Cloudy | |||
Windy | |||
Snowy |
#
Trigger actions based on Mobile AppTrigger Source | Action Types | Secondary information | Trigger actions that will add the users to the dynamic list |
---|---|---|---|
Mobile App | Session Duration | Select session duration from the drop-down | The users who opened the App and visited for the specified duration. |
Uninstalls | Select Yes or No from the drop-down list |
| |
Screen visited | Select the screen name from the drop-down list | The users who have visited the specified screen will be added. | |
User type | Select the User type as Known, Unknown or Identified from the drop-down list | The users will be added to the list based on any one of the below selections
| |
App install | Select Yes or No from the drop-down list. |
| |
App installed date | Select +, -, < or > from the drop-down. Enter the value in the secondary drop-down | The users will be added based on the selected values i.e. either before or after the specified days. Examples:
| |
App uninstalled date | Same as App installed date | ||
Login | Select Yes or No from the drop-down |
| |
When a user views a specific screen | Select the screen name from the drop-down | The users who visited the specific screen | |
Screen views | Select the No. of screen views as Less than 2, 2 to 4, 5 to 7 or More than 7 from the drop-down. | The users will be added based on the specified number of screen views i.e., the number of times the screen was visited by the user. | |
Language | Select the language from the drop-down | The users who visited the mobile app from the device that is configured in the selected language. | |
Last activity | Select the last activity from the drop-down | The users who have performed the last activity as per the drop-down. | |
Operating systems | Select the OS from the drop-down | The users who have visited the mobile app using the specified OS namely iOS and android | |
Location | Enter the location | The users in the specified location. | |
Custom events | Select from the drop-down list | The users who have satisfied the specified custom events |